The Monarch Cosplay – Wrist Shooters

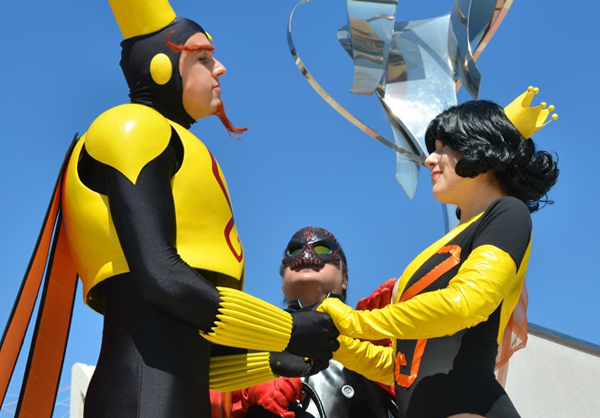
The Monarch’s Wrist Shooters are a deceptively simple piece, even though they don’t actually shoot (yet!). There are a startling variety of ways to go about making them – we’ve seen fabric, cardboard, pieces of PVC pipe, plastic cups, you name it. we’ll be detailing the 2 methods I’ve used.
METHOD 1: Cone & Tubing
This really only works if you want Wrist Shooters resembling those from season 1 or 2. In later seasons they took on a curved, pointed, tapered shape that’s incredibly difficult to reproduce using this method. In fact, we don’t recommend repeating our steps – it’s a pain in the ass, and the Wrist Shooters won’t stand up to repeated wear and abuse without maintenance. However, with only slight changes (which we’ll point out) it’s a simple, cheap, and easy to follow method.
Basically, you take a cone, attach tubes to it, and paint it. The rest is just details.
First off, you need a cone that fits correctly around your forearm. We made ours out of Wonderflex (WF). NOTE: Do not do this. You can easily use cardboard or something similar. We recommend the dense, non-corrugated kind, like from a cereal box. This is easily bent into the proper curve – just be careful not to crease it, as creases are weak points. Sandwiching a healthy dose of hot glue between a second layer of cardboard will make the Wrist Shooters hold their shape indefinitely while still remaining flexible. NOTE: Some thicker (around 1/8″) non-corrugated cardboard is actually many layers of paper, and these layers peel off when things glued to them undergo any kind of force – things like fasteners to hold the Wrist Shooters closed.
Remember: Proper fit is extremely important. Do not make the Wrist Shooters too small. Our first set cut off circulation to our thumbs, putting them to sleep. The first Con we wore these we didn’t notice, and now have permanent nerve damage in our left thumb – we only have about 60% feeling in it 3 years later.
Another option is disposable drink cups – plastic big gulp cups are especially suited to the task and will take lots of abuse. NOTE: This option has worked very well for others, and we recommend it if you can find cups that fit.
- It’s sold in rolls, and getting it straight was a nightmare;
- The rubber it’s made of resists sticking to anything, including hot glue and paint;
- Over time, the natural curve of the tubing reasserts itself and it comes loose;
- Contact that would only scratch rigid tubing instead bends it, causing things to flake and come loose.
NOTE: The problems of keeping the tubing straight and its coming loose could likely be avoided if glued to a rigid surface – such as cardboard or a cup; WF deforms under hot glue, causing a whole cascade of problems.
Use rigid tubing if you can find it in a small enough size. NOTE: If you plan to make your Wrist Shooters curved like they are in Season 4, aluminum tubing is a good choice; while still sold in rolls, it is quite easily bent to the desired shape, is as light as PVC, comes in several diameters, and is still quite cheap (around $0.30/foot).
OPTIONAL: At this point, you can move on to painting if you’re happy with the Wrist Shooters’ shape. Or you can do what we did and fill the gaps between the tubes. This part is as easy or time-consuming as you want it to be.
You can also use clay of some kind. This makes creating those lines easier, but will make the Wrist Shooters very rigid – which may cause problems with getting them on and off. Make sure the clay you use won’t crack over time – Apoxie Sculpt is perfect here as you can sand/carve it further once it cures.
The last step before painting is to fasten them closed somehow. We used elastic, stretching it taught and gluing it in place so that it would pull them closed. Other options include rubber bands, velcro, snaps, magnets, or clasps like those used in clothing – your method will depend on the structure of your Wrist Shooters. Get creative! Whatever you use, make sure it’s firmly attached and won’t come loose.
NOTE: Attach the fasteners before painting – many adhesives interact poorly with paint, especially spray paint.
Then it’s on to painting!
METHOD 2: Resin Casting
Unlike Method 1, this is not something everybody can do. Creating pieces from urethane resin is an advanced process, and takes much more time, skill, and money than Method 1. We won’t address the details of mold making or casting here – the web is full of resources on that. We recommend starting with Smooth-On’s How-To’s.
The downside to resin is that it is mostly rigid – we can barely get our Wrist Shooters on. Heating the resin with a hair dryer softens it slightly, and they can be bent to make removing them easier. Because they are rigid, we don’t need fasteners to keep them in place.
Next…
PAINTING
If you followed Method 2, then simply prime and paint them as you would any other resin piece.Remember: Always let resin cure fully, and prepare it properly – we failed to do so, and the results can be seen in the images. If you followed Method 1, you have a few more things to consider.
Always prime your pieces – it helps paint stick, and generally improves the appearance of the final coat. Make sure whatever primer you use won’t react adversely with your piece – some plastics and rubbers are very finicky. Try it on some scraps first. We prefer the Rustoleum brand of primers, especially their Auto and Filler primer – plus they’re available at Home Depot for cheaper than other brands elsewhere.
If you’ll have to bend your Wrist Shooters a lot to get them on and off, try to use a paint with some flexibility – avoid enamels; they are brittle when dry. Most spray paint is moderately flexible because it bonds so well to the material underneath, but will still crack if bent repeatedly. A top coat of clear polycrylic sealer will delay this, and make your piece more resistant to damage. If you need a lot of flexibility, Michael’s craft stores carry spray paint designed for painting fake flowers. It can even be used to paint boots, gloves, and belts without issue.
That’s it! Unless you want to put little lasers on your Wrist Shooters…
Written by Steven Meissner, SoloRoboto Industries


